How can I import MXF files into Final Cut Pro X (FCP X)?
This guide shows you how to convert or transcode MXF file to Final Cut Pro X supported files with Acrok MXF to FCP X ProRes Converter for Mac.
Below are several disscussions about looking for the way importing MXF files to theFinal Cut Pro X:
Q1: Can't load MXF files into FCP X
I'm interested in the new Canon XC10 camera, but I'm still working on an Apple G5 with FCP X. Is there an application, plug-in, etc. for the older Final Cut Pro to take in MXF files?
Q2: Iimporting .mxf files to Final Cut Pro X
What plug-in do I need to install so i can import and edit Blackmagicdesign .MXF video files in Final Cut Pro X. The suggestion of doing Log and Transfer doesn't work (the .mxf files are gray out not allowing me to select it.)
Q3: Support for MXF from Panasonic AG-HPX370 in FCP?
How do I import .mxf files into Final Cut Pro? This is the latests and greatests software right? There must be a way. Help Please.
Here many folks are talking about how to import MXF files into Final Cut Pro X for editing without rendering time. Well, don't blame to the Final Cut Pro X, the "Import from Camera…" option works just like "Log and Transfer". The thing is, even FCP X does not work with the Canon or Panasonic P2 MXF codec. As far as i know, to solve those problems, the most important piece of the equation is that transcoding MXF files to Final Cut Pro native formats(e.g. Apple ProRes encoded mov format) along with some help from the third-party software. To help those who wanna edit MXF files in Final Cut Pro X, here I share with you a simple guide on how to convert MXF files to Apple ProRes MOV (ProRes 422, ProRes 4444) format and then log and transfer MXF files to FCP for editing flawlessly.
Required Software: Acrok MXF to FCP Converter for Mac (Best Apple ProRes Converter)


The Mac MXF Converter is a professional MXF Converter on Mac OS X which can not only convert MXF to Apple ProRes codec videos for Mac editing, but also provide simple video editing functions for you. The mac MXF to ProRes Converter can convert HD videos from HD camcorders or DVs (like JVC, Panasonic, Sony and Cannon) for editing in Final Cut Pro, Final Cut Pro X, Final Cut Express, iMovie, Avid, Adobe Premiere etc. Below is how.
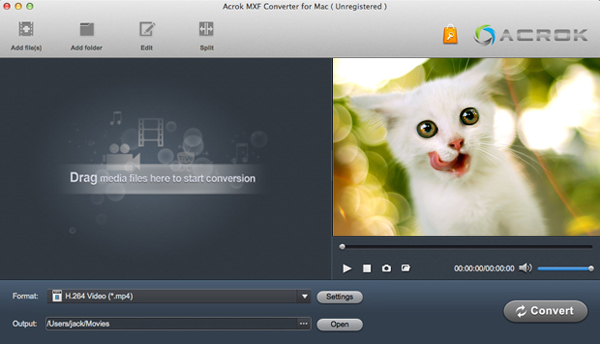
(Before conversion, you need to transfer MXF files from your camcorder or camera to Mac Hard Drive, then click the "add" button to browse to import MXF videos)
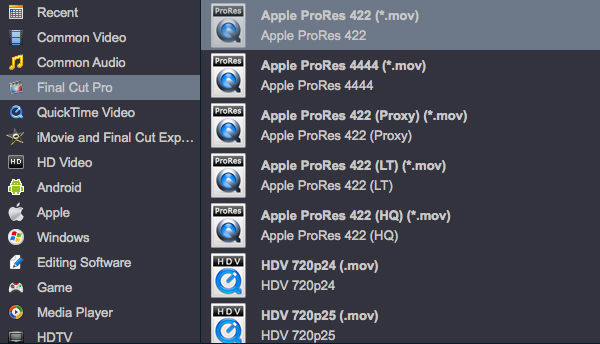
Step 2.Click the format bar, and move mouse cursor to "Final Cut Pro > Apple ProRes 422 (*.mov)" as output format.
Step 3.Click "Convert" button to start transcoding the Canon, Sony, JVC, Blackmagicdesign, RED, or Panasonic P2 MXF files to Apple ProRes Codec.
Some more helpful features of this top MXF conversion software:
Clicking the Format bar, you can choose output formats from the format list or customize which formats to be shown on the list. Here, Apple ProRes 422 MOV is your best choice.
1. Please note that normally no matter how many files you have imported, you can only output the files with the same output format settings. But if you choose Multi-track Video output, you can output multiple videos with same multi-track format, but different track settings. All you need to do is to select one file on list, and click Settings to set. If you haven't specify the settings, the program will help you output with default settings. By default, all audio tracks will be checked and encoded to output. All formats here are set with optimized video/audio codecs, bitrates, frame rates, etc. But you can still specify as you like by clicking Settings button. In the Settings window, you can choose or specify exactly the parameters you like. And in the Task information section, you can compare information from the original video and output video. By clicking the Next and Previous buttons, you can choose to show information of the next or previous MXF file on list.
2. Editor (next to "Add" icon)- click to set deinterlace, denoise, mute, volume up,trim, crop, etc.
So there you have it. Pretty simple. After the workflow, you can go to the outputfolder to find the converted video files. Now you are free to log and transfer or edit MXF files in Final Cut Pro X without problems.
Below are several disscussions about looking for the way importing MXF files to theFinal Cut Pro X:
Q1: Can't load MXF files into FCP X
I'm interested in the new Canon XC10 camera, but I'm still working on an Apple G5 with FCP X. Is there an application, plug-in, etc. for the older Final Cut Pro to take in MXF files?
Q2: Iimporting .mxf files to Final Cut Pro X
What plug-in do I need to install so i can import and edit Blackmagicdesign .MXF video files in Final Cut Pro X. The suggestion of doing Log and Transfer doesn't work (the .mxf files are gray out not allowing me to select it.)
Q3: Support for MXF from Panasonic AG-HPX370 in FCP?
How do I import .mxf files into Final Cut Pro? This is the latests and greatests software right? There must be a way. Help Please.
Here many folks are talking about how to import MXF files into Final Cut Pro X for editing without rendering time. Well, don't blame to the Final Cut Pro X, the "Import from Camera…" option works just like "Log and Transfer". The thing is, even FCP X does not work with the Canon or Panasonic P2 MXF codec. As far as i know, to solve those problems, the most important piece of the equation is that transcoding MXF files to Final Cut Pro native formats(e.g. Apple ProRes encoded mov format) along with some help from the third-party software. To help those who wanna edit MXF files in Final Cut Pro X, here I share with you a simple guide on how to convert MXF files to Apple ProRes MOV (ProRes 422, ProRes 4444) format and then log and transfer MXF files to FCP for editing flawlessly.
Required Software: Acrok MXF to FCP Converter for Mac (Best Apple ProRes Converter)
The Mac MXF Converter is a professional MXF Converter on Mac OS X which can not only convert MXF to Apple ProRes codec videos for Mac editing, but also provide simple video editing functions for you. The mac MXF to ProRes Converter can convert HD videos from HD camcorders or DVs (like JVC, Panasonic, Sony and Cannon) for editing in Final Cut Pro, Final Cut Pro X, Final Cut Express, iMovie, Avid, Adobe Premiere etc. Below is how.
Transcode MXF to Apple ProRes Codec for FCP X editing
Step 1. Import MXF files to the top Mac MXF to FCP ProRes Converter(Before conversion, you need to transfer MXF files from your camcorder or camera to Mac Hard Drive, then click the "add" button to browse to import MXF videos)
Step 2.Click the format bar, and move mouse cursor to "Final Cut Pro > Apple ProRes 422 (*.mov)" as output format.
Step 3.Click "Convert" button to start transcoding the Canon, Sony, JVC, Blackmagicdesign, RED, or Panasonic P2 MXF files to Apple ProRes Codec.
Some more helpful features of this top MXF conversion software:
Clicking the Format bar, you can choose output formats from the format list or customize which formats to be shown on the list. Here, Apple ProRes 422 MOV is your best choice.
1. Please note that normally no matter how many files you have imported, you can only output the files with the same output format settings. But if you choose Multi-track Video output, you can output multiple videos with same multi-track format, but different track settings. All you need to do is to select one file on list, and click Settings to set. If you haven't specify the settings, the program will help you output with default settings. By default, all audio tracks will be checked and encoded to output. All formats here are set with optimized video/audio codecs, bitrates, frame rates, etc. But you can still specify as you like by clicking Settings button. In the Settings window, you can choose or specify exactly the parameters you like. And in the Task information section, you can compare information from the original video and output video. By clicking the Next and Previous buttons, you can choose to show information of the next or previous MXF file on list.
2. Editor (next to "Add" icon)- click to set deinterlace, denoise, mute, volume up,trim, crop, etc.
So there you have it. Pretty simple. After the workflow, you can go to the outputfolder to find the converted video files. Now you are free to log and transfer or edit MXF files in Final Cut Pro X without problems.


Comments
Post a Comment